DarkRoom Camera Raw Tools for Image Editing
Camera raw editing inside ComfyUI. White balance, exposure, HSL, clarity, vibrance, sharpening, noise reduction, and skin tone tools with before/after previews.
e-commerce
image to image
portrait
product photography
style transfer
0
177


Nodes & Models
LoadImage
ImageCompare
DarkroomWhiteBalance
DarkroomExposureTone
DarkroomHSLSelective
DarkroomClarityTextureDehaze
DarkroomVibrance
DarkroomSharpeningPro
DarkroomNoiseReduction
DarkroomSkinToneUniformity
DarkroomColorQualifier
PreviewImageOrMask
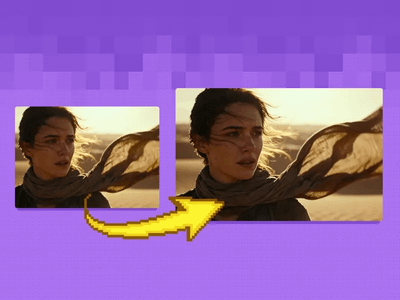
Camera raw editing for any image, right inside ComfyUI.
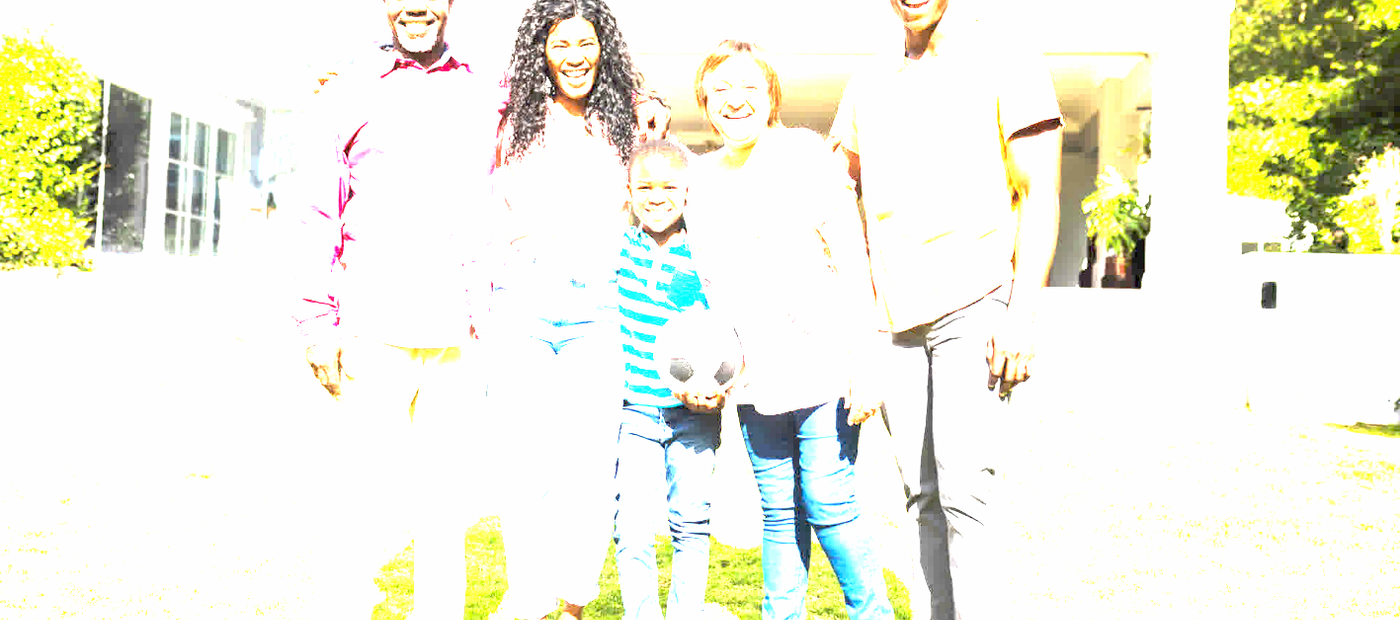
Upload a photo and adjust it using nine DarkRoom tools that work like the panels in Lightroom or Camera Raw. White balance, exposure, HSL color mixer, clarity, vibrance, sharpening, noise reduction, skin tone smoothing, and color qualifier. Each tool runs independently on your source image and shows a before/after comparison so you can see exactly what changed.
No AI generation. No diffusion. These are deterministic image processing tools that give you the same result every time.
How do you use Camera Raw tools with DarkRoom in ComfyUI?
Upload an image, adjust the sliders on each DarkRoom node, and hit Run. Each tool processes your photo independently and feeds into a side-by-side comparer so you can preview the effect before committing. Chain the ones you like together for a final edit.
White Balance Want warmer tones? Push temperature above 6500K. Need cooler, bluer light? Drop it below 5000K. The default sits at 7000K (warm daylight). Tint shifts the green-magenta axis. Most photos need zero tint adjustment.
Exposure and Tone Exposure works in EV stops. The default is set to +5, which is a strong push. For subtle brightening, try 0.5 to 1.5. Contrast defaults to 0. Highlights, shadows, whites, and blacks each have their own slider for targeted tonal control.
HSL Selective Adjust hue, saturation, and luminance for eight individual color bands: red, orange, yellow, green, aqua, blue, purple, magenta. The default shifts red hue by +5 and boosts green saturation to +30. Zero out anything you do not need.
Clarity, Texture, and Dehaze Clarity adds local contrast and midtone punch. Default is 50. Texture enhances surface detail without affecting edges. Dehaze cuts through haze or fog. For portraits, keep clarity around 10 to 30. For landscapes, go higher.
Vibrance Boosts muted colors while leaving already-saturated areas alone. Default is 50 with +2 saturation. Skin tone protection is on by default, so faces stay natural while backgrounds pop.
Sharpening Unsharp mask with edge-aware masking. Amount 100, radius 3, detail 25. Masking at 0 means everything gets sharpened. Raise masking to protect flat areas like sky or skin while sharpening edges only.
Noise Reduction Preset-based. The default is "Color only," which targets chroma noise and leaves luminance detail intact. Luminance amount, detail, and contrast sliders let you dial it in further.
Skin Tone Uniformity Evens out skin tone across the face by pulling colors toward a target range. Preset defaults to "Medium / Olive skin." Six presets cover different skin types. Amount at 100 means full correction. Smoothing radius controls how large the averaging area is.
Color Qualifier Isolate a specific color range and adjust its hue, saturation, and luminance. Preset defaults to "Muted greens." Nineteen presets combine selection and correction. Use it to push greens warmer, desaturate a distracting background color, or shift skin tones.
What is DarkRoom image editing good for?
DarkRoom gives you camera-raw-grade color and tone tools inside ComfyUI. It is best for non-destructive photo correction, color grading, and preparing images before or after AI generation. No model, no VRAM, no randomness.
Portrait retouching where you need consistent skin tones across a batch of photos. Product photography where white balance and exposure need to match between shots. Pre-processing reference images before sending them into ControlNet or IP-Adapter pipelines. Post-processing AI-generated images that come out with flat contrast or muddy colors.
Each tool runs on its own and includes a before/after comparison view, so you can evaluate one adjustment at a time. When you find settings you like, chain the nodes together into a single processing pipeline.
This is not an AI image generator. There is no checkpoint, no sampler, no diffusion model. If you need to add or remove objects, use an inpainting or image-to-image workflow instead.
FAQ
What are DarkRoom tools in ComfyUI? DarkRoom is a set of image processing nodes that replicate camera raw editing controls like white balance, exposure, HSL mixer, clarity, vibrance, sharpening, noise reduction, skin tone correction, and color qualification. They are deterministic tools with no AI model involved.
Can I chain DarkRoom nodes together? Yes. Each node takes an image input and outputs an image. Connect them in sequence for a full editing pipeline. This workflow runs each tool independently for preview, but you can wire them end-to-end for production use.
Does DarkRoom use a GPU or VRAM? The processing is image-based math, not diffusion. It uses minimal GPU resources compared to any Stable Diffusion or Flux workflow. You can run all nine tools on a single image in seconds.
What skin tone presets does DarkRoom support? Skin Tone Uniformity offers six presets covering a range of skin types, from light to dark and warm to olive. Each preset targets a different hue, saturation, and luminance range to keep corrections natural.
How to run DarkRoom Camera Raw editing online? You can run DarkRoom Camera Raw editing online through Floyo. No installation, no setup. Open the workflow in your browser, upload your inputs, and hit run. Free to try.
Read more
_1775699601810.png?width=400&height=300&quality=80&resize=cover)