Anime Next Scene · Text to Image + Image to Image
Describe an anime scene in text, then direct the next shot with a camera or scene change prompt. This two-stage workflow generates connected anime frames with consistent characters, lighting, and composition using Qwen Image and the Next Scene LoRA.
anime
image to image
next scene
qwen
storyboard
text to image
0
34
_1783498909184.png?width=1400&height=620&quality=80&resize=cover)
_1783498909184.png?width=1400&height=620&quality=80&resize=cover)
_1783498909184.png?width=104&height=104&quality=80&resize=cover)
_1783498909184.png?width=104&height=104&quality=80&resize=cover)
Nodes & Models
FloyoStickyNote
EmptySD3LatentImage
MarkdownNote
SaveImage
VAELoader
qwen_image_vae.safetensors
CLIPTextEncode
CLIPLoader
qwen_2.5_vl_7b_fp8_scaled.safetensors
UNETLoader
qwen_image_edit_2509_fp8_e4m3fn.safetensors
qwen_image_fp8_e4m3fn.safetensors
TextEncodeQwenImageEditPlus
LoraLoaderModelOnly
Qwen-Image-Edit-2509-Lightning-4steps-V1.0-bf16.safetensors
Qwen-Image-Lightning-4steps-V1.0.safetensors
next-scene_lora_v1-3000-anime-next-scene-text-Ir7bpz3Q.safetensors
qwen-anime-Illustration-1-anime-next-scene-text-Ir7bpz3Q.safetensors
Qwen-Image-Edit-2511-Anime-2000-anime-next-scene-text-Ir7bpz3Q.safetensors
ModelSamplingAuraFlow
CFGNorm
VAEDecode
KSampler
ConditioningZeroOut
VAEEncode
ImageScaleToTotalPixels
ABOUT THE WORKFLOW
Create Connected Anime Scenes
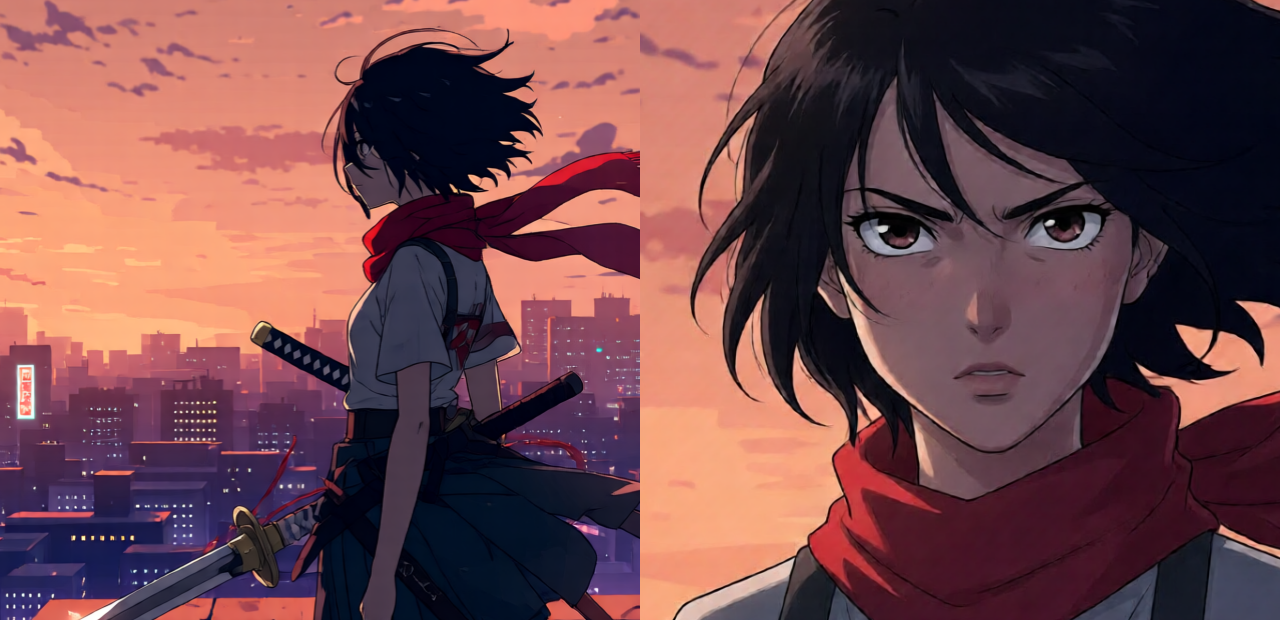
This workflow runs in two stages. Stage 1 generates an anime illustration from a text prompt using Qwen Image with an anime style LoRA. Stage 2 takes that generated scene and creates the next shot based on your direction, preserving the characters, lighting, and composition while changing the camera angle, framing, or action. Both stages run in 4 steps each for fast generation. The output is two connected anime frames ready for storyboards, comics, or animatic sequences.
Model
Qwen Image (fp8) by Alibaba. Text-to-image model used in Stage 1 to generate the first anime scene. Paired with the Qwen Anime Illustration LoRA for cel-shaded anime output and a Lightning LoRA for 4-step speed.
Qwen Image Edit 2509 (fp8) by Alibaba. Image editing model used in Stage 2 to generate the next scene from the first. Paired with the Next Scene LoRA by lovis93 for cinematic shot progression and an anime edit LoRA for consistent style.
HOW IT WORKS
Step 1. Write the first scene prompt
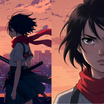
Describe the anime scene you want: characters, setting, lighting, composition, camera angle. "A lone swordswoman standing on a rooftop at dusk, windswept short black hair, red scarf, distant neon city skyline, dramatic orange-purple sky, cinematic wide shot, cel shading, crisp lineart" gives the model a clear target.
Step 2. Write the next scene prompt
Describe how the camera or scene changes. Start with "Next Scene:" and direct the transition. "Next Scene: the camera pushes in to a close-up of the swordswoman's face, same red scarf and neon dusk lighting, determined expression, wind moving her hair." Reference specific details from the first scene to maintain continuity.
Step 3. Hit run
Stage 1 generates the anime scene at 1280x720. Stage 2 reads that image and generates the next shot. Both run in 4 steps each.
Step 4. Download both frames
You get two connected anime images: the opening scene and the next shot. Use them together for storyboards, comic panels, or animatic sequences.
Ready for: storyboards · webtoons · comic panels · animatics · pitch decks · social media
First time? Leave every setting as-is. The prompts, LoRAs, and step counts are preconfigured. Edit only the two prompt fields.
RECOMMENDED SETTINGS
Quick-start guide. Find the goal that matches yours and copy the settings.
Standard two-scene sequence (most people) — Edit the two prompt fields only. Leave everything else at defaults (4 steps, CFG 1, 1280x720). No other changes needed.
Different anime style — Edit the style keywords in the Stage 1 prompt. Replace "cel shading, crisp lineart" with "watercolor anime," "90s retro anime," or "soft pastel illustration." Carry those same style terms into the Stage 2 prompt.
Stronger scene change between frames — Describe a bigger shift in the Next Scene prompt: a different camera angle, a new character entering, or a time-of-day change. The LoRA handles moderate transitions well.
Subtler transition — Keep the Next Scene prompt close to the original. Small shifts like "the camera drifts slightly left" or "her expression softens" produce minimal, refined changes between frames.
Result looks inconsistent between the two frames — Repeat key visual details from Scene 1 in the Next Scene prompt. "Same red scarf, same neon dusk lighting, same character" anchors the continuity.
Artifacts or distortions in the next scene — The Next Scene LoRA and anime edit LoRA are both at strength 1.0. If artifacts appear, consider the source scene complexity. Simpler compositions with fewer characters produce cleaner second frames.
Prompt: Stage 1 is a standard anime scene description: subject, setting, mood, camera, style keywords. Stage 2 always starts with "Next Scene:" followed by the camera or scene direction. Be specific about what changes and what stays the same. "Next Scene: the camera pushes in to a close-up, same character, same lighting" is clearer than "zoom in."
LEARN
📹 Videos
ComfyUI 101 Free Course ft. Sebastian Kamph
Floyo 101 for Team Collaboration
✨ Quick links
USE CASES
📖 Webtoon and Comic Panels
Generate connected panels with consistent characters and settings. Describe the establishing shot, then direct close-ups, reactions, and scene transitions without redrawing.
🎬 Storyboard and Animatic Pre-Production
Block out shot sequences for animation or film. Generate a wide establishing shot, then push in, cut to a reverse angle, or reveal a new element, all with consistent visual continuity.
🎨 Concept Art Sequences
Explore a scene from multiple angles and framings without starting from scratch each time. Generate a key visual, then iterate through camera positions and lighting changes.
📱 Social Media Story Content
Create multi-frame anime stories for Instagram carousels, Twitter threads, or short visual narratives with a consistent look across every image.
WHAT WORKS BEST / WHAT TO AVOID
✅ Works great
Clear scene descriptions with specific character details (hair color, outfit, accessories)
Cinematic camera directions in the Next Scene prompt (push-in, pull-back, tracking, orbit)
Repeating key visual anchors across both prompts (same scarf, same lighting, same character)
Moderate transitions: one major change per scene (angle shift, expression change, new element)
⚠️ May produce softer results
Radical scene changes with no shared visual elements
Vague Next Scene prompts like "make it different"
Overcrowded compositions with many characters in both frames
Dropping all style keywords from the Next Scene prompt
FAQ
What is the Next Scene LoRA?
The Next Scene LoRA is a LoRA adapter by lovis93, fine-tuned on Qwen Image Edit 2509. It teaches the model to generate the next shot in a visual sequence while preserving character identity, camera geometry, lighting, and spatial relationships from the previous frame. It understands cinematic transitions like dolly shots, push-ins, pull-backs, tracking moves, and reveals.
How does this workflow differ from running two separate text-to-image generations?
Two separate generations produce unrelated images. This workflow feeds the Stage 1 output into Stage 2 as a reference, so the Next Scene LoRA can read the characters, composition, and lighting and evolve them into the next shot. The result is two frames that look like they belong in the same scene, not two random illustrations.
Can I chain more than two scenes together?
The workflow generates two frames per run. To build a longer sequence, take the second frame and feed it back into Stage 2 as a new starting point, writing a fresh Next Scene prompt for each subsequent shot. Each generation maintains continuity from the previous frame.
Do I need to match the prompt style between Stage 1 and Stage 2?
Yes. Carry the same style keywords (cel shading, vibrant colors, clean lineart) and key visual details (character description, lighting, setting) from Stage 1 into the Stage 2 prompt. The more overlap in the descriptions, the stronger the visual consistency between frames.
What resolution does this workflow output?
Stage 1 generates at 1280x720 (16:9 widescreen). Stage 2 outputs at a resolution matched to the input image, scaled to approximately 1 megapixel. Both frames are anime-style illustrations at screen-ready resolution.
Is this workflow licensed for commercial use?
The Next Scene LoRA is released under the MIT license. The Qwen Image and Qwen Image Edit models are open source by Alibaba. Commercial use is permitted under these licenses. Review each model's terms for your specific use case.
How to run Qwen anime next scene generation online?
You can run Qwen anime next scene generation online through Floyo. No installation, no setup, no local GPU needed. Open the workflow in your browser, write your scene prompts, and hit run. Free to try.
WHY FLOYO?
Floyo is the only platform with team collaboration for ComfyUI in the browser. You run workflows with no install. You share run history, assets, and models across your team. You pay only when you generate. Floyo supports open-source and closed-source models.
A designer runs an edit and likes the result. A teammate opens that exact run from shared history and keeps going. No file handoffs. No version confusion.
For studios and enterprise teams, Floyo adds private workspaces, pooled resources, and a team usage dashboard. Other ComfyUI cloud tools run for one person at a time. Floyo runs for the whole team, with transparent per-generation costs.
Ready to try it?
Describe your first anime scene, direct the next shot, and hit run.
Questions? Watch the free course or check the FAQ above.
Read more

_1775699601810.png?width=400&height=300&quality=80&resize=cover)
_1783028563354.gif?width=400&height=300&quality=80&resize=cover)