Bernini-R - Generation & Edit for Image and Videos
Edit or generate video with Bernini, ByteDance's open-source unified video model. Upload a clip, add reference images, describe the change, and run it.
Bernini-R
Image Editing
Image Generation
Multi-Model
R2V
Video Editing
Video Generation
0
390


Nodes & Models
LoadVideo
FrameInterpolationModelLoader
film_net_fp16.safetensors
ResolutionSelector
LoadImage
FrameInterpolate
KSamplerSelect
MarkdownNote
PrimitiveInt
ComfySwitchNode
VAELoader
wan_2.1_vae.safetensors
ComfyMathExpression
PrimitiveBoolean
CLIPLoader
umt5_xxl_fp8_e4m3fn_scaled.safetensors
CreateVideo
LoraLoaderModelOnly
Wan21_T2V_14B_lightx2v_cfg_step_distill_lora_rank64.safetensors
GetVideoComponents
BasicScheduler
Video Slice
CLIPTextEncode
SplitSigmas
SaveVideo
SamplerCustom
VAEDecode
BerniniConditioning
UnetLoaderGGUF
UnetLoaderGGUF
UnetLoaderGGUF
UnetLoaderGGUF
UnetLoaderGGUF
ABOUT THE WORKFLOW
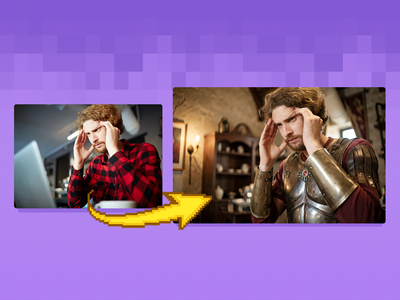
Edit a video from a prompt
Upload a source video, add one or more reference images, and describe what you want changed. Bernini reads the clip and your instruction together, then returns a new video with your edit applied and everything you did not mention left intact. It also generates video from a prompt or an image when you start without source footage.
This is the quantized GGUF build, split into a high-noise and low-noise stage, so it runs lighter and faster than the full model while keeping the same editing behaviour.
Model
Bernini by ByteDance. An open-source video model that pairs a semantic planner with a renderer built on Wan, strong at instruction-based edits that hold identity and detail across the whole clip.
HOW IT WORKS
Step 1. Upload your source video
The clip you want to edit. A short, clear shot gives the cleanest result.
Works great with: live action · stock footage · screen recordings · animation
Step 2. Add reference images (optional)
Add up to five images to steer the edit, such as a subject to insert, a garment to swap in, a style to match, or a weather look to apply.
Use them for: subject identity · materials · style · scene look
Step 3. Write your instruction
Say what to change in plain language, like "swap the background to a snowy street at night, keep the car" or "restyle the whole clip as hand-painted animation."
Step 4. Set aspect ratio and length (optional)
Match the aspect ratio to your source so faces and motion stay stable. Set the length in frames for a longer or shorter result.
Step 5. Hit run and download
Bernini applies the edit and returns the video. Preview it in the workflow, then download.
Ready for: Premiere · DaVinci Resolve · After Effects · CapCut
First time? Leave every setting as-is. The defaults (9:16 portrait, 81 frames, 24 fps) are the right starting point for almost everyone.
RECOMMENDED SETTINGS
Quick-start guide. Find the goal that matches yours and copy the settings.
Standard edit (most people). 9:16 portrait, 81 frames, 24 fps. The right starting point for almost everyone.
Match a different shape. Switch the aspect ratio to fit your source. Keep it close to the original so faces and motion do not stretch.
Want a longer clip. Raise the length in frames. Longer runs take more time, so step up once you are happy with the look on a short test.
Need to hold a subject's identity. Feed two or three clear reference images with consistent hair, lighting, and expression. The model uses them to keep the subject stable.
The background or camera keeps drifting. Add language to your instruction that locks the camera and scene, and name what to keep. Reinforce it with a short negative prompt.
The edit is not landing. Be specific about what to change and what to preserve. A broad instruction like "make it cinematic" gives the model too much room.
Want smoother motion. Turn on frame interpolation to raise the frame rate after generation for a softer playback.
Prompt: Name the change and what to keep in one clear line. "Replace the jacket with a red leather one, keep the pose and background" works better than "change the outfit." When you add references, say what each image contributes.
LEARN
📹 Videos
ComfyUI 101 Free Course ft. Sebastian Kamph
Floyo 101 for Team Collaboration
✨ Quick links
USE CASES
🎬 Video Editors
Swap backgrounds, change weather, or restyle a shot from a text instruction, without rotoscoping or masking by hand.
👕 Product & Fashion
Change a garment, material, or product detail from a reference image while the model, pose, and scene stay put.
🎭 VFX & Subject Insertion
Drop a subject from a reference image into existing footage and keep their identity consistent across the clip.
🎨 Style & Motion Designers
Transform live footage into a new art style or look across the whole video for pitches, idents, and social cuts.
🖼️ Concept & Pre-viz
Generate video from a prompt or a single image to block out a scene before committing to a full shoot or CG build.
WHAT WORKS BEST / WHAT TO AVOID
✅ Works great
Short, clear source clips with steady motion
Specific instructions that name what to change and what to keep
Two or three consistent reference images for identity
Aspect ratio close to the source video
⚠️ May produce softer results
Long, complex clips with many cuts
Vague instructions like "make it better"
Large aspect ratio mismatches between source and output
Crowded scenes with many competing subjects
FAQ
What is Bernini?
Bernini is ByteDance's open-source video model for generation and editing in one framework. It uses a semantic planner that reasons about your instruction, then a renderer built on Wan to produce the frames. It handles text-to-video, image-to-video, prompt-based editing, and reference-guided editing.
What can Bernini do that single-purpose video models cannot?
Bernini runs many tasks in one model instead of one model per job. You can generate from text, edit an existing clip, insert a subject from a reference image, or change style and weather, all from the same workflow. Its strongest trait is keeping unedited regions stable across the clip.
How does video editing with Bernini work?
You upload a source video and describe the change in a prompt. The model reads the footage and your instruction together, applies the edit, and keeps everything you did not mention frozen. You can add reference images to steer the subject, material, style, or scene look.
What is the GGUF version of Bernini?
GGUF is a quantized format that shrinks the model so it runs on lighter hardware and generates faster. This workflow uses the GGUF 14B build split into a high-noise and low-noise stage. Output quality stays close to the full model for most editing tasks.
How long can a Bernini video be?
The model targets short clips, around 3 to 15 seconds depending on frame rate and length settings. This workflow defaults to 81 frames at 24 fps. Raise the length for a longer result, and test on a short clip first since longer runs take more time.
Can I use Bernini results commercially?
Bernini is released by ByteDance under the Apache 2.0 license, which allows commercial use. Review the current license and terms before shipping, and make sure you hold the rights to any source video and reference images you upload.
How to run Bernini online?
You can run Bernini online through Floyo. No installation, no setup, no API key to wire up. Open the workflow in your browser, upload your video and references, and hit run. Free to try.
WHY FLOYO?
Floyo is the only platform with team collaboration for ComfyUI in the browser. You run workflows with no install. You share run history, assets, and models across your team. You pay only when you generate. Floyo supports open-source and closed-source models.
A designer runs an edit and likes the result. A teammate opens that exact run from shared history and keeps going. No file handoffs. No version confusion.
For studios and enterprise teams, Floyo adds private workspaces, pooled resources, and a team usage dashboard. Other ComfyUI cloud tools run for one person at a time. Floyo runs for the whole team, with transparent per-generation costs.
Ready to try it?
Upload a clip, add a reference, describe the change, and run it. The settings are already set.
Questions? Watch the free course or check the FAQ above.
Read more