Storyboard to Video — GPT Image 2 + Seedance 2.0
Turn a written scene description into a full animated video — in two stages.
character-consistency
gpt-image-2
image-to-video
seedance-2
storyboard
storyboard-to-video
vlm
1
11

_1781263305417.webp?width=1400&height=620&quality=80&resize=cover)
_1781263305417.webp?width=104&height=104&quality=80&resize=cover)
Nodes & Models
LLM_floyo
GPTImage2TextToImage_floyo
VLM_floyo
Seedance20ReferenceToVideo_floyo
VideoToFrames
LoadImage
MarkdownNote
OrchestratorNodeGroupBypasser
ImageStitch
PreviewAny
PreviewImage
SaveImage
StringConcatenate
VHS_VideoCombine
VHS_VideoCombine
VHS_VideoCombine
How to use it — 2 stages
Stage 1 — Generate the Storyboard 🎬
⚠️ Make sure the Seedance 2.0 group is bypassed first (right-click the group → Bypass Group Nodes)
Write your full scene description in the prompt — describe the action like a mini script, beat by beat
Hit Queue
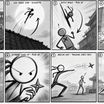
GPT Image 2 generates an 8-panel storyboard showing your entire sequence
Stage 2 — Animate with Seedance 2.0 🎥
⚠️ Remove the bypass from Seedance 2.0, and bypass the storyboard generator group instead
Upload your Storyboard image (from Stage 1) into the "Storyboard" LoadImage node
Upload your Character image — a clear reference of your character's face and outfit
Hit Run — the VLM node reads both images and writes a guided prompt, then Seedance 2.0 animates your storyboard into a full video, keeping your character consistent throughout
✍️ Writing Your Scene Description
Describe the full action sequence like a mini script — beginning to end.
A ninja sprints across a rooftop beneath the moonlit
night sky before launching high into the air. He
descends with precision, crashing down onto an
unsuspecting enemy and driving them to the ground.

As the enemy falls, the ninja slips behind the corner
of a structure, disappearing from sight. Cut to a
close-up of his eyes peering around the wall — focused,
alert, scanning for danger...
Tips:
Write it as a sequence of beats — each beat becomes a storyboard panel
Include camera details → close-up, wide shot, cut to
Describe character actions clearly and in order
🧩 How character consistency works
ImageStitch combines your Character image and Storyboard side by side into one image
VLM node reads this combined image along with your original scene description
StringConcatenate appends identity rules to the prompt:
@image_1 is the character — maintain facial and
outfit identity in the generation.

@image_2 is only for rough scene composition.
DO NOT generate arrows or text from this image.
Seedance 2.0 receives the final guided prompt and generates the animation
This means your character's face and outfit stay locked in, while the storyboard only guides the scene layout and action — not the appearance.
Read more