

Krea 2 · Drawing to Image
Turn a rough sketch into a photorealistic image that keeps your layout, using Krea 2 Turbo and an Identity Edit LoRA. Upload a drawing, describe it, hit run.
drawing to image
Image
image editing
krea 2
krea 2 turbo
LoRAs
sketch to image
340



Nodes & Models
UNETLoader
krea2_turbo_fp8_scaled.safetensors
CLIPLoader
qwen3vl_4b_fp8_scaled.safetensors
VAELoader
qwen_image_vae.safetensors
LoadImage
ResolutionSelector
Note
LoraLoaderModelOnly
krea2_identity_edit_v1_2-krea-2-drawing-to-imag-HlwlEZbv.safetensors
VAEEncode
EmptySD3LatentImage
Krea2EditGroundedEncode
Krea2EditModelPatch
KSampler
VAEDecode
SaveImage
FloyoStickyNote
ABOUT THE WORKFLOW
Turn a drawing into a photo
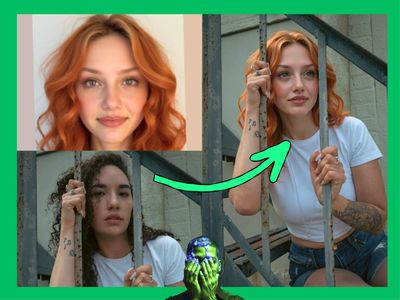
Upload a rough sketch or layout and describe what it should become. The model turns it into a photorealistic image while keeping the position of every object you drew. Add an optional second image to place a person into the scene.
Model
Krea 2 Turbo by Krea AI. A 12B open weights image model built from scratch, distilled to run fast on consumer hardware across a wide range of styles. Released under the Krea 2 Community License.
Krea 2 Identity Edit v1.2 by conradlocke. A community add-on that reads your drawing and follows your written instruction while holding the spatial layout in place.
HOW IT WORKS
Step 1. Upload your drawing
Your sketch, wireframe, or rough layout. Around 1 megapixel works best.
Works great with: sketches · wireframes · floor plans · rough layouts
Step 2. Describe the scene
Say what the drawing should become, like "transform this layout into a cozy living room with morning sunlight." Be specific about materials, lighting, and style.
Step 3. Add a person (optional)
Turn on the second image to place someone into the scene, for insert-into-scene edits.
Step 4. Hit run and download
The model renders a photorealistic image that keeps your layout. Preview it in the workflow, then download.
Ready for: Photoshop · Figma · moodboards · pitch decks
First time? Leave every setting as-is. The defaults (1:1 · reference boost 4 · 10 steps) are the right starting point for almost everyone.
RECOMMENDED SETTINGS
Quick-start guide. Find the goal that matches yours and copy the settings.
Standard use (most people) — 1:1 square, reference boost 4, grounding 768, 10 steps, guidance 1. The right starting point for almost everyone.
Change the output shape — pick a different aspect ratio to match your target, like 16:9 for a wide shot or a portrait ratio for a tall one.
Keep the layout tighter — raise the reference boost above 4 so placement stays closer to your drawing. Push it too high and edits like removals start to fail.
Want more creative freedom — lower the reference boost below 4 so the model follows your drawing more loosely.
The result comes out doubled — lower the grounding below 768 so the model reads less of the drawing at once.
Trade instruction for detail — drop steps to 8 for stronger instruction adherence, or raise to 12 for finer detail. 10 is balanced.
Prompt: Describe what the drawing should become and name the materials, lighting, and style. "Transform this layout into a cozy living room with morning sunlight, oak floors, and linen sofas" beats "make it a room." When you insert a person, say where they go, like "place this person at the table holding a coffee."
LEARN
📹 Videos
ComfyUI 101 Free Course ft. Sebastian Kamph
Floyo 101 for Team Collaboration
✨ Quick links
USE CASES
🛋️ Interior & Space Design
Turn a room sketch or floor plan into a photorealistic interior for a client pitch.
✏️ Concept to Comp
Render a rough layout into a finished frame while keeping every element where you placed it.
🎬 Storyboard to Still
Turn a blocked-out storyboard panel into a photoreal shot for previs.
🧍 Insert a Person
Drop a specific person into a designed scene with the optional second image.
WHAT WORKS BEST / WHAT TO AVOID
✅ Works great
Clear sketches with distinct objects
Inputs around 1 megapixel
Prompts that name materials, lighting, and style
A defined layout to preserve
⚠️ May produce softer results
Dense, cluttered drawings
Vague instructions like "make it nice"
Inputs far above 1 megapixel
A prompt that fights the layout you drew
FAQ
What is Krea 2 Turbo?
Krea 2 Turbo is the fast version of Krea 2, a 12B open-weights image model from Krea AI trained from scratch. Turbo is distilled to generate in a handful of steps at high resolution on consumer hardware, across a wide range of visual styles. This workflow pairs it with an identity edit add-on to turn drawings into finished images.
How does drawing-to-image work here?
You upload a sketch and a written instruction. The Identity Edit LoRA reads your drawing and keeps the position of every object, while Krea 2 renders the scene photorealistically based on your prompt. The result matches your layout but looks like a finished image rather than a sketch.
What is reference boost, and what should I set it to?
Reference boost is the dial for how closely the result follows your drawing. The default of 4 gives a strong match to your layout and reliable edits. Raise it to hold placement even tighter, though pushing it too high can cause edits like removals to fail, and lower it when you want the model to take more creative liberty.
Can I put a specific person into the scene?
Yes. Turn on the optional second image, which ships off by default. The scene stays as the first image and the person goes in the second, then you describe where they belong, like placing them at a table. Keep two-person inputs at or below roughly 1.5 megapixels for the cleanest result.
What size should my drawing be?
Inputs around 1 megapixel work best. The model reads your layout most reliably at that size, and images far above it can come out softer or doubled. If that happens, lowering the grounding setting helps the model read the drawing more cleanly.
Can I use Krea 2 commercially?
Krea 2 is released under the Krea 2 Community License, which allows free commercial use for individuals and teams with under 50 seats. Larger organisations need Krea's enterprise license. The community identity edit add-on carries its own terms, and you should hold the rights to any image you upload.
How to run Krea 2 online?
You can run Krea 2 online through Floyo. No installation, no setup, no API key to wire up. Open the workflow in your browser, upload a drawing, describe the scene, and hit run. Free to try.
WHY FLOYO?
Floyo is the only platform with team collaboration for ComfyUI in the browser. You run workflows with no install. You share run history, assets, and models across your team. You pay only when you generate. Floyo supports open-source and closed-source models.
A designer renders a concept and likes the result. A teammate opens that exact run from shared history and keeps going. No file handoffs. No version confusion.
For studios and enterprise teams, Floyo adds private workspaces, pooled resources, and a team usage dashboard. Other ComfyUI cloud tools run for one person at a time. Floyo runs for the whole team, with transparent per-generation costs.
Ready to try it?
Upload a drawing, describe the scene, and run it. The settings are already set.
Questions? Watch the free course or check the FAQ above.
Read more

_1786518453053.png?width=400&height=300&quality=80&resize=cover)





