Hi3D V3 · Image to 3D
Upload one image and Hi3D V3 by Math Magic reconstructs it into a high-detail 3D model with textures and PBR materials. Pick your format and download.
3d model
3d printing
glb
hi3d
image to 3d
122

Nodes & Models
Hi3dV3ImageTo3d_floyo
LoadImage
Preview3D
ShowText|pysssss
ShowText|pysssss
ABOUT THE WORKFLOW
Generate a 3D Model from One Image Upload a single image and Hi3D V3 reconstructs it as a full 3D mesh with textures and PBR materials. The output is a downloadable model file ready for game engines, 3D printing, or further editing. No prompts needed.
Partner node. This workflow calls an external API, so each run uses credits from your API wallet. No API key needed. Floyo handles the connection.
Model
Hi3D V3 by Math Magic. A proprietary image-to-3D model operating at 2048³ voxel resolution, strong at fine geometric detail, clean textures, and PBR material generation.
HOW IT WORKS
Step 1. Upload your image A clear photo, render, or concept art of the object you want as a 3D model. One subject, good lighting, minimal occlusion. Works great with: characters · products · props · sculptures · concept art
Step 2. Hit run The settings are already configured for a high-quality output. For a first run, change nothing.
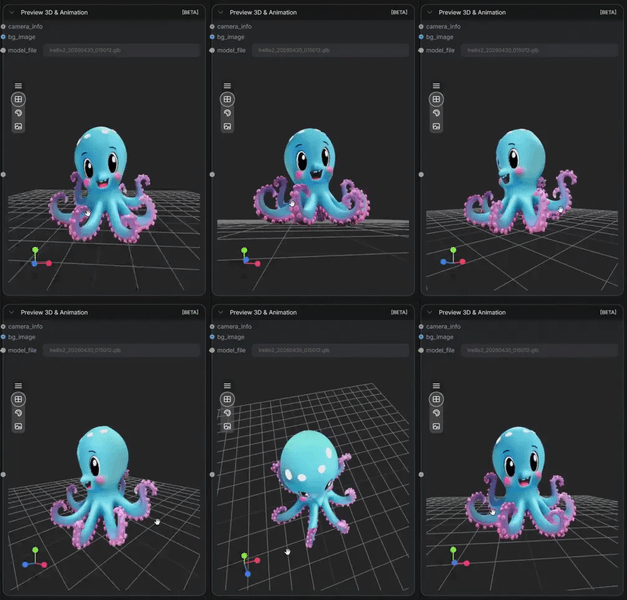
Step 3. Preview and download The 3D model renders in an interactive preview right in the workflow. Rotate it, inspect it, then download the file. Ready for: Unity · Unreal · Blender · Bambu Studio · OrcaSlicer
First time? Leave every setting as-is. The defaults (2048 quality · GLB · PBR on · 2M faces) are the right starting point for almost everyone.
RECOMMENDED SETTINGS
Quick-start guide. Find the goal that matches yours and copy the settings.
Standard 3D model (most people) — 2048quality · GLB · PBR on · 2M faces · shading 0.5. The right starting point for almost everyone.
Need the highest possible detail — Switch resolution to 2048master and raise face count to 5,000,000. Slower, but captures finer surface detail for close-up inspection or large prints.
Exporting for a game engine — Keep GLB format and PBR enabled. The output includes metallic, roughness, and normal maps that drop into Unity or Unreal material slots.
Preparing for 3D printing — Switch export format to STL or OBJ. Turn PBR off if your slicer does not use material maps. Keep face count at 2M or higher for clean surface detail at print scale.
Want a geometry-only mesh for sculpting — Turn enable_texture off to get a clean untextured mesh. Good for retopology, manual texturing, or ZBrush import.
Colors look baked-in or too dark — Lower the shading value toward 0 to reduce de-lighting. Raise it toward 1 for stronger light removal from the source image.
Prompt: This workflow does not use a text prompt. The 3D model is generated entirely from the uploaded image. For the best results, use a well-lit photo with the full subject visible, a clean background, and minimal occlusion from other objects.
LEARN
📹 Videos
ComfyUI 101 Free Course ft. Sebastian Kamph
Floyo 101 for Team Collaboration
✨ Quick links
USE CASES
🎮 Game Developers Turn concept art or reference photos into mesh assets you can drop into Unity or Unreal with PBR materials already assigned.
🖨️ 3D Printing Generate a high-face-count mesh from a product photo, figurine reference, or character design and send it to your slicer.
🎨 3D Artists & Sculptors Skip the base mesh phase. Generate a starting model from a reference image and refine it in Blender, ZBrush, or Maya.
🛍️ Product Visualization & E-commerce Convert product photos into 3D models for interactive viewers, AR previews, or catalog renders.
💡 Concept Artists Rapid 3D blocking from 2D concept art. Get a rotatable 3D version of a character or prop to check proportions and silhouette from every angle.
WHAT WORKS BEST / WHAT TO AVOID
✅ Works great
Clean, well-lit photos of a single subject
Character art and figurine references
Product images on plain backgrounds
Concept art with clear silhouettes
⚠️ May produce softer results
Multiple overlapping objects in one image
Heavy occlusion where key parts are hidden
Flat or low-contrast images with little depth information
Busy backgrounds that compete with the subject
FAQ
What is Hi3D V3 and how is it different from earlier versions? Hi3D V3 is the latest image-to-3D model from Math Magic, operating at 2048³ voxel resolution. Earlier versions maxed out at 1536³. The higher resolution means sharper geometry, better handling of complex structures like intersecting parts, and cleaner texture output at up to 8K.
What does PBR mean and should I leave it on? PBR stands for physically based rendering. When enabled, the model outputs metallic, roughness, and normal maps alongside the base texture. Leave it on if the model is going into a game engine or 3D renderer. Turn it off if you only need a colored mesh for printing or sculpting.
What is the difference between 2048quality and 2048master? 2048quality is the faster option with a recommended face count of 2,000,000. 2048master is slower but captures finer surface detail, recommended with 5,000,000 faces. Use quality for most work and master when you need maximum geometric precision for close-up inspection or large-format prints.
Can I use Hi3D V3 outputs for commercial projects? Hi3D V3 is a proprietary model by Math Magic. Commercial use is allowed for paid users, who retain full ownership of outputs. Free-tier users may use outputs commercially but must credit "Created with Hitem3D." Review Math Magic's current terms for your specific use case.
What export formats does Hi3D V3 support? The workflow supports GLB, OBJ, FBX, STL, and USDZ. GLB is the default and works with most game engines, 3D viewers, and web applications. Use OBJ or STL for 3D printing software. Use FBX for animation pipelines. Use USDZ for Apple AR Quick Look.
Does the shading setting affect the final texture? Yes. The shading value controls how much baked-in lighting the model removes from the source image before generating textures. A value of 0 keeps the original lighting. A value of 1 removes as much as possible. The default of 0.5 works well for most images.
How to run Hi3D V3 online? You can run Hi3D V3 online through Floyo. No installation, no setup, no API key to wire up. Open the workflow in your browser, upload your image, and hit run. Free to try.
WHY FLOYO?
Floyo is the only platform with team collaboration for ComfyUI in the browser. You run workflows with no install. You share run history, assets, and models across your team. You pay only when you generate. Floyo supports open-source and closed-source models.
A designer runs an edit and likes the result. A teammate opens that exact run from shared history and keeps going. No file handoffs. No version confusion.
For studios and enterprise teams, Floyo adds private workspaces, pooled resources, and a team usage dashboard. Other ComfyUI cloud tools run for one person at a time. Floyo runs for the whole team, with transparent per-generation costs.
Ready to try it? Upload an image of any object and run it. The settings are already set.
Questions? Watch the free course or check the FAQ above.
Read more