AI Travel Vlogger Generator · Image to Video
Upload a person photo and a location photo, composite them into a selfie-style travel image with Nano Banana 2, then animate it into a 10-second talking vlog clip with Kling 2.6 Pro.
Image
kling
nano banana 2
travel vlog
ugc
Video
155
_1772477545790_1782989405316.webp)

Nodes & Models
Kling26Pro_floyo
NanoBanana2Unified_floyo
VideoToFrames
LoadImage
OrchestratorNodeGroupBypasser
SaveImage
FloyoStickyNote
VHS_VideoCombine
ABOUT THE WORKFLOW
Create a Travel Vlog Video
Upload two images: a person and a travel destination. Step 1 composites them into a front-camera selfie shot of the person at the location. Step 2 takes that image and animates it into a 10-second vertical video where the vlogger speaks to camera with lip-synced dialogue, handheld phone movement, and ambient outdoor audio. Run Step 1 first, check the result, then enable and run Step 2.
Partner node. This workflow calls an external API, so each run uses credits from your API wallet. No API key needed. Floyo handles the connection.
Model
Nano Banana 2 by Google. Used in Step 1 to composite the person and location into a selfie-style travel image with accurate face, clothing, and background preservation.
Kling 2.6 Pro by Kuaishou. Used in Step 2 to animate the composited image into a talking vlog clip with native audio, lip-sync, and handheld camera feel.
HOW IT WORKS
Step 1. Upload your model image
A photo of the person who will appear in the vlog. Front-facing, well-lit, with visible face and shoulders.
Works great with: portraits · influencer photos · AI-generated characters
Step 2. Upload your location image
A photo of the travel destination. Landmarks, cityscapes, beaches, mountains, or streets.
Works great with: landmarks · skylines · beaches · temples · street scenes · nature
Step 3. Run Step 1 to generate the selfie composite
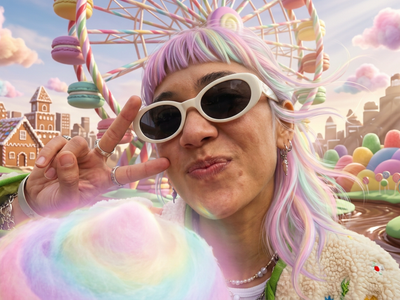
Nano Banana 2 composites the person into a front-camera selfie at the location, with the destination centered in the background. Preview the result and check framing before continuing.
Step 4. Load the generated image into Step 2
Upload the output from Step 1 into the "Add your final image" input. Enable Step 2 in the workflow.
Step 5. Edit the dialogue and run Step 2
Write what the vlogger says and how they move. Kling 2.6 Pro animates the image into a 10-second vertical video with lip-sync, handheld phone shake, natural head movement, and outdoor ambient sound.
Ready for: TikTok · Instagram Reels · YouTube Shorts · travel blogs · social ads
First time? Run Step 1 first. Check the image. Then enable Step 2 and run again. Edit only the prompts to match your location and dialogue.
RECOMMENDED SETTINGS
Quick-start guide. Find the goal that matches yours and copy the settings.
Standard travel vlog clip — Step 1: 9:16, 1K, 1 image. Step 2: 10 seconds, audio on. Edit the prompts to match your location and dialogue.
Different destination — Swap the location image and edit both prompts. Replace "Great Wall" with the new landmark name in the Step 1 scene description and the Step 2 motion prompt.
Different vlogger — Swap the model image. Any front-facing portrait works. The workflow composites whoever you upload into the selfie.
Multiple destinations with the same vlogger — Keep the same model image and swap location images across runs. Each run places the person at a different landmark.
Location not visible enough — Edit the Step 1 prompt: "The [landmark] is clearly visible behind him, centered in the background, taking up at least half the frame." More spatial detail gives the model clearer placement cues.
Video feels too static — Add a camera reveal to the Step 2 prompt: "Mid-sentence, he turns his upper body and tilts the camera to show the location behind him, then brings it back." This creates a natural vlog movement.
Lip-sync looks off — Keep dialogue lines under 12 words. Short, casual lines sync better than long sentences.
Prompt: Step 1 describes the selfie composition: where the person is, how they hold the camera, and what is visible behind them. Step 2 describes the motion, camera feel, and dialogue. "He briefly turns to show the view, then brings the camera back to his face and says 'You have to see this place'" is specific. "Person talks at a landmark" is not.
LEARN
📹 Videos
ComfyUI 101 Free Course ft. Sebastian Kamph
Floyo 101 for Team Collaboration
✨ Quick links
USE CASES
✈️ Travel Content at Scale
Generate vertical vlog clips from any landmark photo without traveling. Swap destinations across runs to build a full travel series from one person photo.
📱 Social Media Travel Posts
Create scroll-stopping selfie-style travel videos with spoken dialogue for TikTok, Reels, and Shorts without filming on location.
🏨 Tourism and Hospitality Marketing
Place a presenter at a hotel, resort, or attraction and generate a talking review clip with natural body language and ambient audio.
👤 Virtual Travel Influencer Content
Build a consistent AI travel persona by using the same model image across dozens of destination runs, producing a library of location clips with matching identity.
WHAT WORKS BEST / WHAT TO AVOID
✅ Works great
Clear, front-facing model photos with visible face and shoulders
Location photos with iconic landmarks or distinctive scenery
Short, casual dialogue lines under 12 words each
Prompts that describe the selfie angle and what is visible in the background
⚠️ May produce softer results
Model photos with sunglasses, heavy occlusion, or profile angles
Location photos taken at night or in very low light
Long monologue scripts with no physical movement described
Requesting wide-angle or drone-style camera moves in a selfie-format video
FAQ
What is the AI Travel Vlogger Generator workflow?
A two-step pipeline that generates travel vlog videos from two photos. Step 1 uses Nano Banana 2 to composite a person into a front-camera selfie at a travel destination. Step 2 uses Kling 2.6 Pro to animate that image into a 10-second vertical video with spoken dialogue, lip-sync, handheld phone movement, and outdoor ambient audio.
Do I need to visit the location to create the video?
No. Upload any photo of any destination as the location image. The workflow composites the person into a selfie at that location and generates the video with realistic lighting and depth. The person never needs to be at the location.
Does the video include spoken dialogue with lip-sync?
Yes. Write the spoken lines in quotes in the Step 2 prompt. Kling 2.6 Pro generates the voice and matches mouth movement to the speech. Keep lines short and conversational for clean sync.
Can I use the same person across multiple destination videos?
Yes. Keep the same model image and swap the location image across runs. The workflow preserves the person's face, hair, and clothing in every composite, so the full series looks like the same vlogger visiting different places.
Why does the workflow run in two steps instead of one?
Step 1 generates a static selfie image of the person at the destination. You preview and approve the framing, face placement, and background visibility before Step 2 animates it. This gives you control over the composition before committing to the longer video generation.
What makes the video look like a real travel vlog?
The Step 2 prompt is structured for selfie-camera feel: handheld phone shake, one arm partially visible, irregular blinking, small head nods, and a brief turn to show the landmark. These micro-movements match how real vloggers film on phones.
How to run AI travel vlog generation online?
You can run AI travel vlog generation online through Floyo. No installation, no setup, no API key to wire up. Open the workflow in your browser, upload your inputs, and hit run. Free to try.
WHY FLOYO?
Floyo is the only platform with team collaboration for ComfyUI in the browser. You run workflows with no install. You share run history, assets, and models across your team. You pay only when you generate. Floyo supports open-source and closed-source models.
A designer runs an edit and likes the result. A teammate opens that exact run from shared history and keeps going. No file handoffs. No version confusion.
For studios and enterprise teams, Floyo adds private workspaces, pooled resources, and a team usage dashboard. Other ComfyUI cloud tools run for one person at a time. Floyo runs for the whole team, with transparent per-generation costs.
Ready to try it?
Upload a person photo and a destination photo, write the vlog dialogue, and run both steps.
Questions? Watch the free course or check the FAQ above.
Read more