Fast LoRA Training for Flux via Floyo API
FLUX is great at generating images, but locking in a specific aesthetic or character is easier with a LoRA. Here's how to create your own.
API
Flux
LoRa Training
17
3.9k


Nodes & Models
LoadImagesFromFolderKJ
LoadImagesFromFolderKJ
ShowText|pysssss
ShowText|pysssss
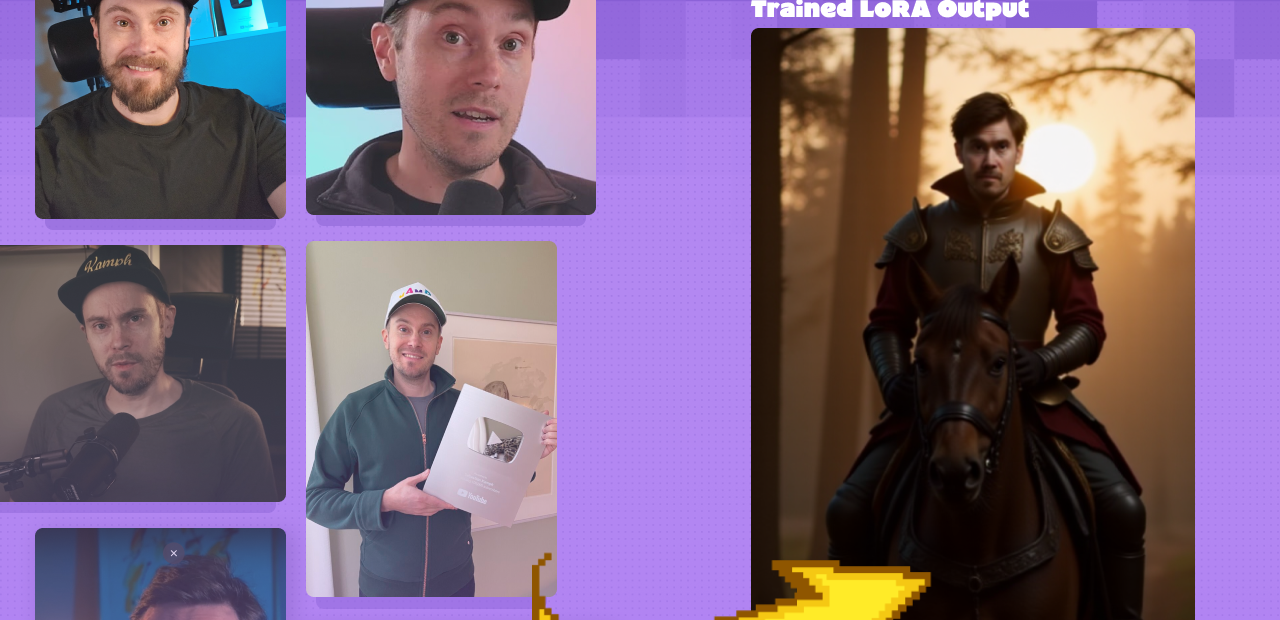
Train a custom Flux LoRA from your own images without leaving Floyo.
Upload a folder of images, set a trigger word, and hit run. The workflow sends your dataset to the Fal.ai training API, which trains a Flux LoRA and returns a download URL for the .safetensors file. Training takes 5-10 minutes with default settings. Since training runs on the API (not inside ComfyUI), you can use a Quick machine for this workflow.
Once trained, use your LoRA in any Flux text-to-image or image-to-image workflow to generate images of your specific character, product, or style.
How do you train a Flux LoRA on Floyo?
Upload your image dataset to a folder in your ComfyUI input directory, set the folder path, add a trigger word, and run. The workflow trains a Flux LoRA using the Fal.ai API. Default is 2000 steps with auto-captioning and mask creation enabled. Training takes 5-10 minutes. The output is a download URL for your .safetensors file.
Step 1: Upload your dataset Open the ComfyUI directory and navigate to the input folder. Create a new folder and upload your images there. If you name the folder "Test", the path looks like: ../user_data/comfyui/input/Test
Then paste the folder path into the LoadImagesFromFolder node. If you're accessing it from your Floyo inputs folder, the path format is: input/#input/your_dataset_folder_name
Images load at 1024x1024, cropped to fit.
Step 2: Prep your images Quality matters more than quantity. A few things that make a difference:
Fewer high-resolution images (1024x1024 or larger) beat many low-quality ones. Every image should clearly show the character, product, or style you're training on. No artifacts, no watermarks, no blurry shots.
For people, aim for 10-20 images with variety: 5 headshots, 5 full-body, 5 half-body, 5 in different scenes and backgrounds. This variety helps the LoRA generalize instead of locking to one pose or setting.
Step 3: Set your trigger word Type a unique trigger word in the FluxLoraTrainer node. Default is "nami." This word becomes the activation phrase you'll use in prompts when generating with the LoRA. Pick something distinctive that won't collide with common words. "sks_character" or "mystyle_v1" works better than "woman" or "portrait."
Step 4: Configure training
Steps (default: 2000) Controls how long the model trains on your dataset. 2000 steps works well for most use cases. Want to compare results? Train multiple checkpoints at 500, 1000, 1500, and 2000 steps, then pick the one that balances style accuracy with prompt responsiveness.
Too few steps: the character becomes less recognizable or the style fades. Too many steps: the model overfits and stops following your prompts. 2000 is a solid starting point.
Create Masks (default: on) Automatically generates masks for your training images. Helps the model focus on the subject rather than the background. Leave this on for character and product LoRAs.
Is Style (default: off) Turn this on if you're training a style LoRA (art style, color grading, aesthetic) rather than a character or object. When enabled, the trainer skips auto-captioning and relies on your custom captions and trigger word instead. If you've written your own .txt caption files for each image, enable this.
Captioning tips By default, the trainer auto-captions your images. This works well for most datasets. If you want more control, create a .txt file for each image with the same filename. In the caption, describe the content only (what's in the image), and leave style cues to the trigger word. Turn on is_style to skip auto-captioning when using custom captions.
Step 5: Get your LoRA After training completes (5-10 minutes), a download URL appears in the Preview Text node. Copy the URL, paste it into your browser, and download the .safetensors file. Rename it to something descriptive, then upload it to your ComfyUI models/loras/ folder using the Upload by URL feature in the file browser.
Your LoRA is now ready to use in any Flux workflow that supports LoRA loading.
What is Flux LoRA training good for?
LoRA training lets you teach Flux to generate a specific character, product, or visual style that the base model doesn't know. Once trained, you use a trigger word in your prompts and the LoRA activates, producing images that match your training data. This is how you get consistent characters, branded product shots, and custom art styles.
Character consistency. Train a LoRA on photos or illustrations of a specific person or character. Use the trigger word in any prompt and that character appears with consistent features across different scenes, poses, and lighting conditions. This is the foundation for AI influencer pipelines, character-driven content, and visual storytelling.
Product photography. Train on product shots and generate new angles, backgrounds, and lighting setups while keeping the product looking identical. Useful for e-commerce catalogs where you need the same product in 20 different settings.
Custom art styles. Train on a collection of images in a specific aesthetic (a particular illustration style, color palette, or visual treatment). The LoRA captures the style, and you activate it with the trigger word to apply that look to any prompt.
Brand identity. Train on brand assets to lock in a visual style across all generated content. Marketing teams use this to keep AI-generated visuals on-brand without manual editing.
The quality tradeoff. Your LoRA is only as good as your dataset. Blurry, inconsistent, or low-quality training images produce a blurry, inconsistent LoRA. Invest time in curating your dataset. 10 excellent images train a better LoRA than 50 mediocre ones.
FAQ
How many images do I need to train a Flux LoRA?
10-20 high-quality images is the sweet spot for character LoRAs. For style LoRAs, 15-30 images that clearly represent the aesthetic work well. Every image should be at least 1024x1024, artifact-free, and clearly show the subject. Quality beats quantity every time.
How long does LoRA training take on Floyo?
5-10 minutes with default settings (2000 steps). Training runs on the Fal.ai API, not inside ComfyUI, so you can use a Quick (cheaper) machine. The output is a download URL for your .safetensors file.
What training steps should I use for my Flux LoRA?
Start with 2000. If the LoRA is too weak (character doesn't look right), increase steps. If it overfits (ignores your prompts and only produces training data), decrease steps. Training at multiple checkpoints (500, 1000, 1500, 2000) and comparing results is the best way to find the sweet spot for your specific dataset.
Do I need to write captions for my training images?
Not required. The trainer auto-captions by default, which works well for most datasets. Write custom captions when you want precise control over what the model learns. Each caption goes in a .txt file with the same name as the image. Describe the content (what's in the image), not the style. Let the trigger word handle style activation.
How do I use my trained LoRA in a Flux workflow?
Download the .safetensors file from the output URL. Upload it to your ComfyUI models/loras/ folder. In any Flux workflow with a LoRA loader, select your file and include your trigger word in the prompt. The LoRA activates and the model generates images matching your trained subject or style.
How do I run Fast LoRA Training for Flux online?
You can run this workflow online through Floyo. No installation, no setup. Open the workflow in your browser, upload your dataset, and hit run. Free to try.
Read more